Hi Kids, I posted this tutorial last year. It was a hit and I thought it was worthy of a repost. :-)
Decked Out Urban Grafitti Eggs Worth Finding. Tutorial
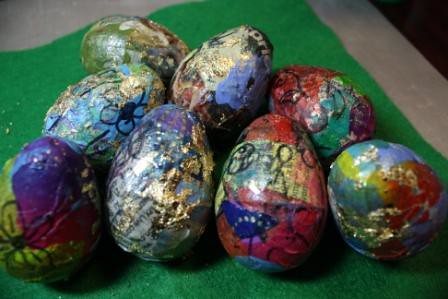
Awwww, just in time for Easter! I have been wanting to do a tutorial on Easter egg decorating for quite some time now, but I wanted to make something unique, fun and easy. I think I managed to do it. Big bang for cheap bucks. You know it's going to be easy, so don't let these pictures fool you. Here are a couple of pics of the finished product.
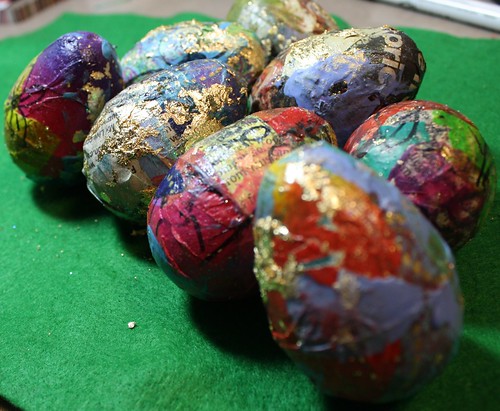
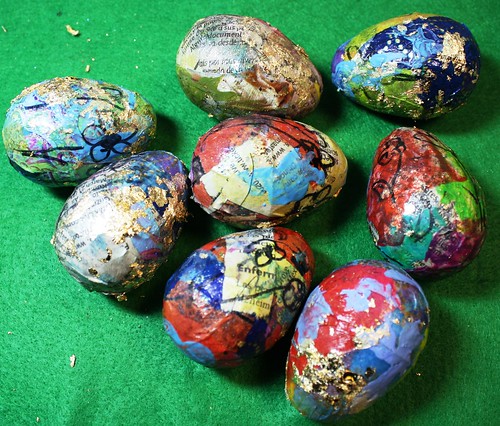
Don't they look delicious? The best part is, that no chicks were sacrificed! These are made from el cheapo plastic ones. I know, not too environmentally friendly, however, I had to pick, and saving a chick won over filling a landfill. I am sure these can be recycled some how, some way.
Ok, on to the tutorial.
Here is a tiny list of supplies.
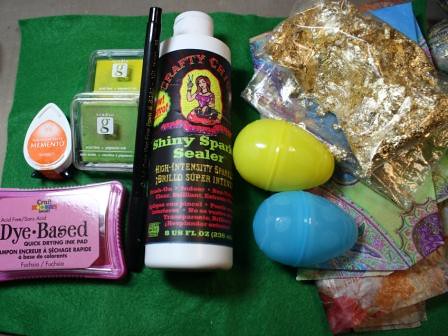
bag of plastic eggs
varnish. I used Crafty Chica's varnish with glitter.
(if you are using a plain varnish, add glitter for a little vavoom)
various ink pads
decorative tissue paper (gift wrap tissue papers work great)
Newspaper
black marker pen
gold leaf flakes (you can get these at Joann's or Michaels and use a coupon)
water
wax paper (for your work surface and for a place for your eggs to dry)
paint brush
**optional**
crayons and small quilting iron
Normally, I take pics of steps, and I did, but they disappeared somewhere from me taking out my memory card and sticking it in my puter. Grrrrrrrrrrrr.
No worries, because it is so easy, and there are so few steps, I am confident, that you will be able to follow me.
Step one.
tear your decorative tissue and newspaper into small strips . and then coat your eggs with varnish and start applying strips in random places. I covered some eggs with just tissue, some with just newspaper strips and some with a little of both.
After eggs are completely covered, let dry.
Step 2.
Give your eggs a little rub down with your colored ink pads. I just rub the eggs directly on my ink pads in random places. If they get to much ink in one area, I just wipe a little of the excess off with a paper towel.
Step 3. Dip your brush into your water container and then dip brush into your gold leafing and start applying to your eggs in random spots. Go as crazy as you want. I love the gold shimmer, and I love the blinged out look.
Let dry.
After eggs are dry, you can start free drawing some doodles on your eggs for a more "urban feel" of you can grab your favorite rubber stamp and stamp a few images here and there. Really, at this point, you can do anything. glue some charms, fibers, anything. There is no wrong or right way to complete your eggs.
**optional**
To take my eggs to the next level, I heated up my mini quilting iron and melted some crayons directly on the iron, and randomly applied the melted crayon to my eggs for an encaustic touch.
Need more explanation on encaustic? Click here for an easy tutorial I did in the past.
Viola,
Tricked out eggs that will be the talk of the hunt!
I hope you give this idea a try, and do tell a homie!
Comments
how i have missed you...welcome to Spring and all things beautiful.
warmly,
rebecca