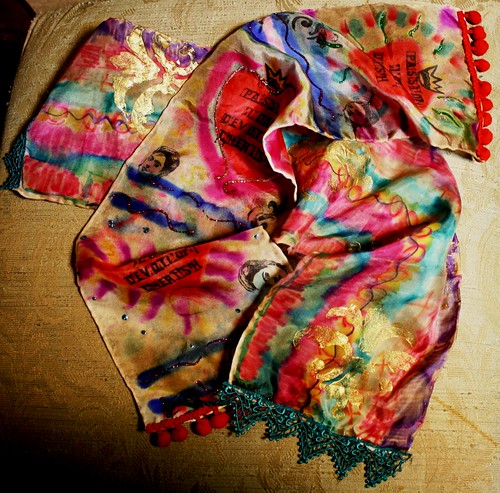
Today, we will make these.
Finally, I had some tiempo to kick it in my studio and put together another free tutorial just for you. I love giving it away. I am really good at it, just ask my homies. Ok, I kid, I kid. What I mean is, I love teaching and sharing! This week was loaded with teaching ops. I recently taught two art classes at a middle school in Elk Grove, and I have a follow up gig at Sac State. I still wrestling with that gig, but I am sure it will all work out.
Oh, sorry for getting off point. Where was I, ahhh yes, a free tutorial just for you! You know how I do, I like to keep it cheap and easy. (shut up Krissi!) I love to find quick and easy projects that can be completed at the same time. Completion is a very big challenge for me. I love starting things, and when the novelty wears off, I tend to kick my projects to the curb. I don't mean to, it just happens. ::sigh:: I am digressing again. Sawry.
So, like I was saying, you can start and finish this project in less than an hour! Heck you can do it in 10 minutes if you want. But since it is so much fun, you will probably like to take your time to do it right. You know, nice and slow! Rarrw. (whoops, here I go again)
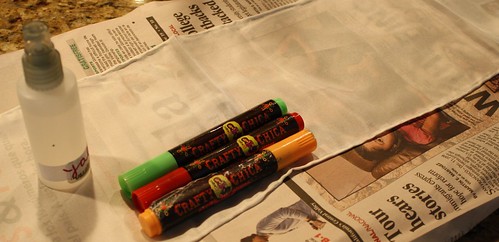
Mmmkay, here is your list of materials.
1 blank silk scarf. You can get them uber cheap here,
small spray bottle of rubbing alcohol.
Permanent markers, any brand will do as long as they are permanent ink. Today, I am using the wonderful Crafty Chica Brand. (by the way, I love the big juicy tips on these markers)
Embellishments:
You can go crazy here. For today, I am using rubber stamps, and permanent ink. you can use any brand as long as it is ink based.
Beaded trims. (anything goes)
fabric glue. I used aleene's fabric fusion by Duncan.
Step one.
lay your scarf on a protected surface. I used newspaper. Then grab your markers and get busy. You don't have to be super neat either. (trust me)
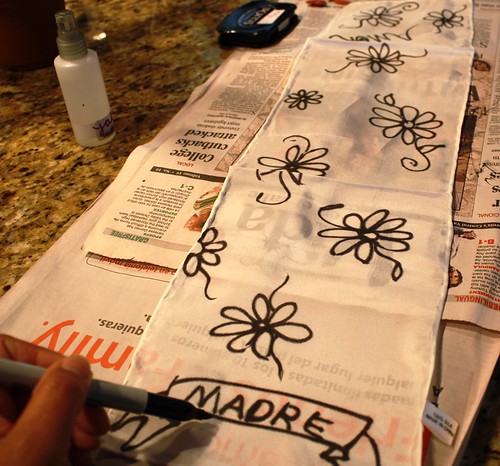
I am just doing a random drawing of flowers and then I am going to color in the flowers and loosely, apply color in the background.


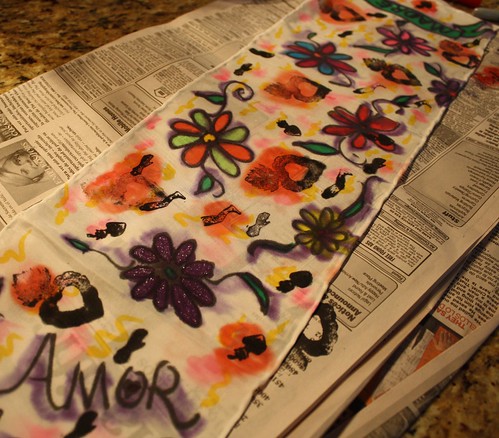
To make your inks permanent and wash friendly, heat set your scarf with an iron on low setting.
You can stop here or your can add your favorite trims.
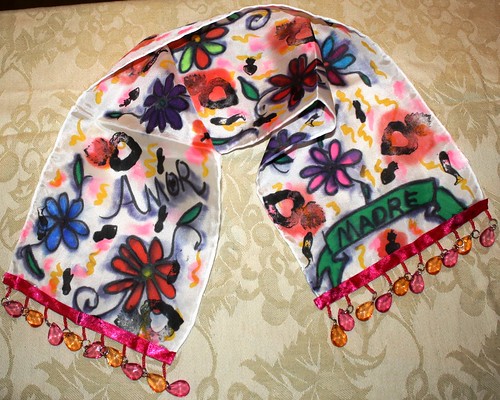
Viola! Finito, just like that. You have a one of a kind custom Hand dyed silk scarf!
This project is kid friendly too.
Please feel free to share this tutorial amongst your homies, and do share your photos!
Keep it Sacred Chicas!
This project is kid friendly too.
Please feel free to share this tutorial amongst your homies, and do share your photos!
Keep it Sacred Chicas!
Comments
http://sewing.craftgossip.com/tutorial-color-your-fabric-with-markers-and-alcohol-inks/2009/04/21/
--Anne
Found a blog online where someones posted your tutorials without giving you any credit
http://scarycraft.blogspot.com/search/label/embellish
I thought you'd wanna know :/
Saludos,
Yoli